Time to complete the series of lesser daemons with the footsoldiers of Nurgle: Plaguebearers.
Introduction
Unlike Bloodletters, Pink Horrors and Daemonettes, Plaguebearers don't have a preset, 'canonical' color scheme. In fact, Nurgle doesn't have a preset color scheme; except that everything needs to be green/brown at the base, and as disgusting as possible on top of that. I already tried out some fun techniques with the Nurgle Chaos Spawn; now, I decided on another route.
Getting to it
Step 0. Extract your models from the sprues and glue them together. Not detailed here.
Step 1. Prime your models in white
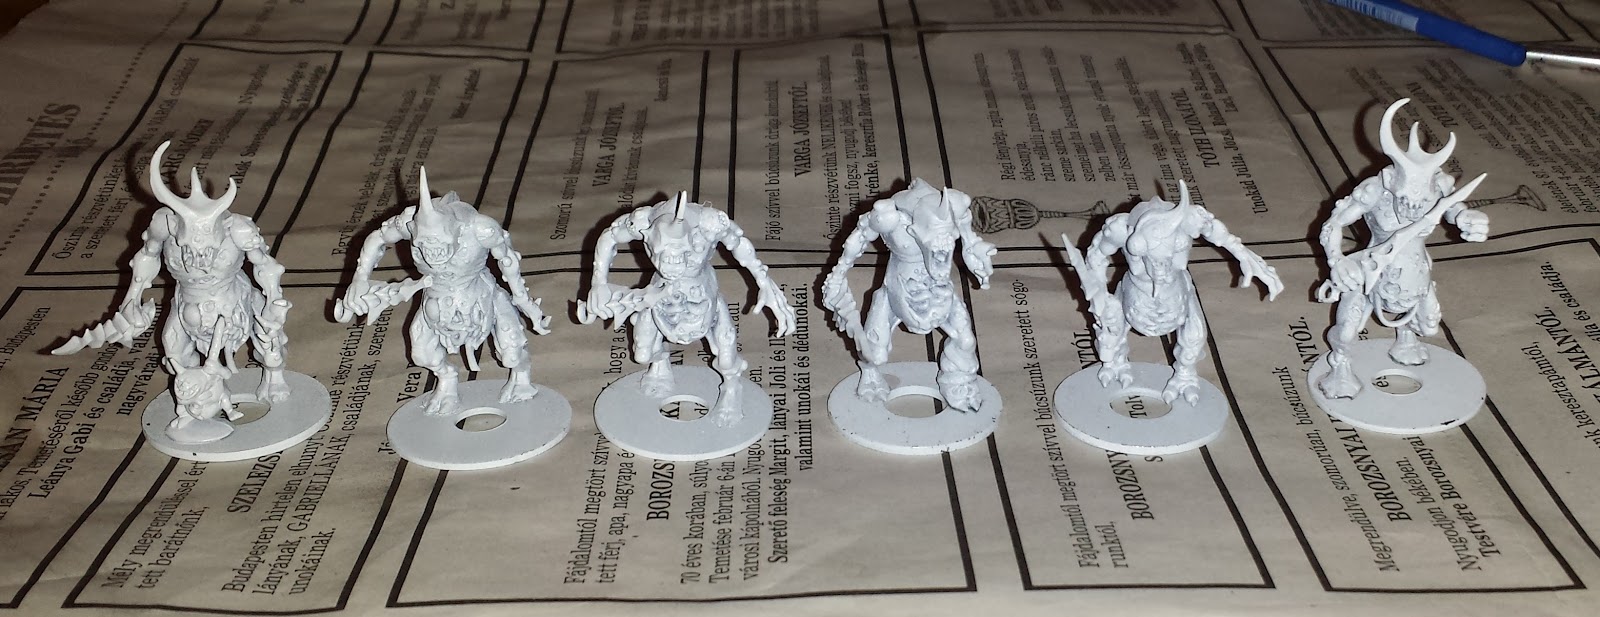
I guess black could work, but I want them bright and colorful, like the rest of the army.
Step 2. Body: corpse-green rotted flesh
This is achieved in three steps. First, apply a basecoat of a sickly green (GW Nurgling Green, Vallejo Dead Flesh).

Then, apply a generous wash of green. Since I don't have green wash, I diluted regular green paint with water until it had a wash-like quality. This will darken the overall tone:

I applied the final step after taking care of some details.
Step 3. Details basecoat
I painted the swords black.
The original plan for the horns was brown with bonewhite drybrush. However, unlike Bloodletter horns, they are smooth and are connected to the body seamlessly. So I tried my hand at wet blending brown with green at the base of the horns and bonewhite towards the tip.

The original plan for the horns was brown with bonewhite drybrush. However, unlike Bloodletter horns, they are smooth and are connected to the body seamlessly. So I tried my hand at wet blending brown with green at the base of the horns and bonewhite towards the tip.

Then there are some unique parts: the pipe (rotting wood), the banner (corroded bronze) and the champion's sack of heads (painted as rotting guts). For now, they just get a basecoat. I painted the pipes brown, with leather brown for the strings tying them together. The banner got the same brown overall basecoat, then a coat of bronze over the metallic parts. The champion's trophy got a bonewhite layer on the heads, and a brown/leather brown coat for the straps. Later, the tiny threads sewing the mouths and eyes shut also got a brown coat.

Step 4. Body drybrush
Finally, apply an overall drybrush with neon green ("scorpion green").This will pop out all the details that won't receive further attention - the face, the knuckles, tendons, etc.

Step 5. Body details basecoat
The boils and pustules received a yellow coat.

The exposed guts, tendons and bones got a layer of bonewhite. Nurgling companions receive the same treatment.

The exposed guts, tendons and bones got a layer of bonewhite. Nurgling companions receive the same treatment.

Step 6. Finishing the details
Use a deep red wash. I have no such thing, so I mixed a bit of violet with a good amount of blood red, then watered it down to the desired consistency. Apply generously to the guts; then apply (less generously) over the pustules. This creates the illusion of bloody, exposed innards, as well as bruised, torn flesh.


The swords get a bright green edge highlight - just a hint of poison.
The grinning heads inside the stomach of two Plaguebearers got a bonewhite basecoat, black wash, then drybrush.

The shrunken heads are not "fresh" innards; they are dried and withered. Apply a black wash, then a slight drybrush on the flat surfaces.

The fanged mouths inside the stomachs got a detailed treatment. I painted the base flesh a reddish brown, then brown on the fangs. Apply a red wash, then highlight the fangs with bonewhite.

The vertical mouths do not have a base flesh, they grow directly out of the dead surface flesh, so skip the base part.


The instrument and banner get a black wash. Then drybrush with the original base colors.
Apply a bit of black wash to the feet, just enough to reveal toes and claws. Paint the eyes red, then black wash around them, then highlight the center with bright red.
Most guys have closed mouths, so a black wash suffices on the dead flesh basecoat. The open mouths get red insides, then generous black wash, then pink highlights on the tongues.

One guy had an insect head. I applied a grey basecoat, then a strong black wash on the eyes.


Apply a bit of black wash to the feet, just enough to reveal toes and claws. Paint the eyes red, then black wash around them, then highlight the center with bright red.
Most guys have closed mouths, so a black wash suffices on the dead flesh basecoat. The open mouths get red insides, then generous black wash, then pink highlights on the tongues.
One guy had an insect head. I applied a grey basecoat, then a strong black wash on the eyes.

Step 7. Basing
I envisioned a dried out, grey earth, covered by patches of dead grass interspersed with dried out bushes.

Unfortunately, I misjudged my materials. Unlike the bright green grass used for the Daemonettes, my dead grass consisted of longer strands, and I could not create the patchy effect I was looking for. I just covered everything with grey earth, then everything with dead grass (even obscuring the previously placed bushes) and hoped for the best.

Fortunately, the PVA glue that I use to finish my basing weighed down the strands of grass and created a more life-like terrain.

Finished!


Really really great job!! I just got back into painting Warhammer recently after about a decade. As a devout Nurglite I started with Plaguebearers. But I lost most of my tips, tricks, and general painting know-how over the years, so this tutorial helped give me a few ideas to work with :)
ReplyDeleteI really like how you used brown on the horns, that's exactly what I wanted so it's helpful to see how you did them.
The red wash on white based guts is also good stuff. Overall great job and Ty for posting!
Thanks! I have another squad in the works I'll be publishing soon, then a squad of Nurglings after that :-)
Delete